|
INSTRUCTIONS FOR |
|
L.E.D. TAIL LAMPS
FACTORY SOCKET CONVERSION |

|
|
|
07-UP YUKON / XL / DENALI
(With production date of May / 2006 and later) |
|
|
|
LEDT-611C, CB, CR, CS |
|
|
|
|
|
|
|
|
|
|
|
|
|
|
(NOTE: If your vehicle is a 07-Up Suburban/Tahoe
or a Yukon/XL/Denali of production date earliler than May/2006, you will not
need the extra sockets provided with your new tail lights.) |
|
| 1. |
|
2. |
|
|
|
4. |
|
|
|
|
|
|
|
|
|
|
|
|
|
|
|
|
|
|
|
|
|
|
|
|
|
|
|
|
|
|
|
|
|
|
|
|
|
|
|
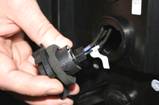
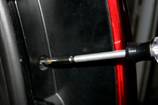
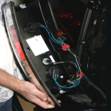
Unscrew the 2 factory (Phillips
head) screws on the stock tail light. |
|
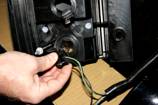
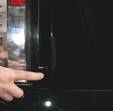
Then, pull factory light
directly backwards off vehicle to unsecure the 2 locking pins from the body
plugs. |
|
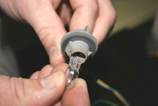
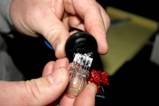
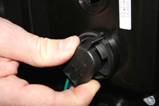
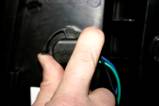
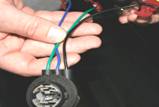
Remove the factory sockets from
back of the stock light by twisting them counter-clockwise. |
|
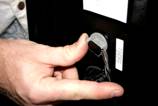
Remove the small 194 style bulb
from the gray light socket. (You will
not re-use it in your new light.) |
|
| 5. |
|
6. |
|
7. |
|
8. |
|
|
|
|
|
|
|
|
|
|
|
|
|
|
|
|
|
|
|
|
|
|
|
|
|
|
|
|
|
|
|
|
|
|
|
|
|
|
|
|
|
|
|
|
|
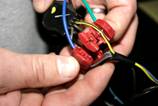
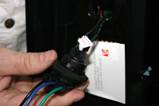
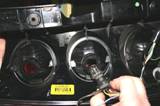
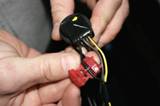
Start conversion process by
securing the supplied IPCW sockets to factory tail light wiring harness with
vehicle's MIDDLE socket
first. |
|
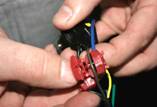
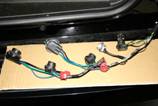
The middle black socket on the
vehicle contains 2 black
wires, 2 brown wires,
and 1 yellow wire
with a black tracer on it is what we are working on first. |
|
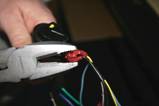
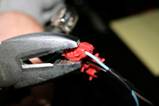
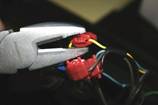
Take the supplied IPCW socket BLACK wire and secure the red
connector around the BLACK wire on vehicle's middle socket harness. Clamp this connector tight to secure it
properly. |
|
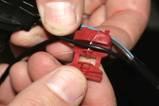
Next, take the supplied IPCW
socket BLUE wire and secure
the red connector around the BROWN wire on the vehicle's middle socket harness. |
|
| 9. |
|
10. |
|
11. |
|
12. |
|
|
|
|
|
|
|
|
|
|
|
|
|
|
|
|
|
|
|
|
|
|
|
|
|
|
|
|
|
|
|
|
|
|
|
|
|
|
|
Be sure to clamp this connector
tight so it is secured properly. |
|
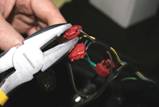
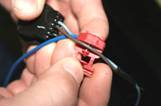
The final wire on the supplied
IPCW socket is GREEN. Secure the red connector around the YELLOW wire with black tracer of
the vehicle's middle socket harness. |
|
Be sure to clamp this connector
tight so it is secured properly. |
|
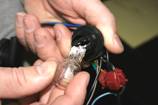
Now the last step for this
middle vehicle's socket is to remove the light bulb. (You will not re-use this bulb in your IPCW
LED tail light.) |
|
| 13. |
|
14. |
|
|
|
16. |
|
|
|
|
|
|
|
|
|
|
|
|
|
|
|
|
|
|
|
|
|
|
|
|
|
|
|
|
|
|
|
|
|
|
|
|
|
|
|
Next is the vehicle's TOP socket
with 1 black wire, 1 brown wire, and 1 blue wire. Take the supplied IPCW socket BLACK wire and secure red
connector around the BLACK wire on this socket harness. |
|
Be sure to clamp this connector
tight so it is secured properly. |
|
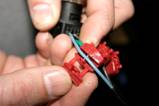
Take the supplied IPCW socket BLUE wire and secure the red
connector around the BROWN wire on the vehicle's top socket harness. |
|
Be sure to clamp this connector
tight so it is secured properly. |
|
| 17. |
|
18. |
|
19. |
|
20. |
|
|
|
|
|
|
|
|
|
|
|
|
|
|
|
|
|
|
|
|
|
|
|
|
|
|
|
|
|
|
|
|
|
The final wire on the IPCW
socket is GREEN.
Secure the red connector around the BLUE wire of the vehicle's top
socket. |
|
Be sure to clamp this connector
tight so it is secured properly. |
|
The last step for this top
vehicle's socket is to remove the light bulb.
(You will not re-use this bulb in your IPCW LED tail light.) |
|
The connversion is complete and
now time to install the IPCW LED tail lights on your vehicle. |
|
| 21. |
|
22. |
|
23. |
|
24. |
|
|
|
|
|
|
|
|
|
|
|
|
|
|
|
|
|
|
|
|
|
|
|
|
|
|
|
|
|
|
|
|
|
The very bottom socket that is
for the reverse light still has the factory bulb installed will be the first
one that you secure into the back of the IPCW tail light. |
|
The next socket to install will
be the middle converted IPCW socket into the IPCW tail light. (IMPORTANT:
The plug in the IPCW light must be installed into the socket matching the
black wire to black wire.) |
|
Gently twisting the socket to
make sure it is secured properly. |
|
We now will install the small
gray socket into the back of the IPCW tail light. (This socket is not used so there will be
no electrical connector to plug in.) |
|
| 25. |
|
26. |
|
27. |
|
28. |
|
|
|
|
|
|
|
|
|
|
|
|
|
|
|
|
|
|
|
|
|
|
|
|
|
|
|
|
|
|
|
|
|
|
|
|
|
|
|
|
|
|
|
|
|
The final IPCW converted socket
to install will be the top one.
(IMPORTANT: The plug in the
IPCW light must be installed into the socket matching the black
wire to black wire.) |
|
Gently twisting the socket to
make sure it is secured properly. |
|
Test all of the functions of the
lights, brake, turn, and running to ensure proper operation. |
|
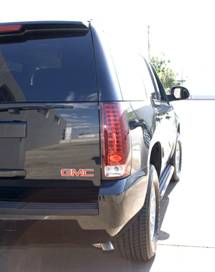
Now align the two securing tabs
of the IPCW tail light with the body plugs and install the light onto the
vehicle. (This may require slight
presure to fully insert the locating tabs into the body plugs.) |
|
| 29. |
|
30. |
|
|
|
|
|
|
|
|
|
|
|
|
|
|
Thank you for your purchase. We
hope you enjoy your |
|
|
|
|
new IPCW LED Tail Lights. |
|
|
|
|
|
|
|
|
|
|
|
|
|
|
|
|
|
|
|
|
Re-install the 2 factory
(Phillips head) screws firmly to secure the tail light on the vehicle. The above steps are the same for both the
driver and passenger side tail light so it is necessary to repeat in the same
order. |
|
|
|
|
|
|
|
|
|
|
|
|
|
|
|
|
|
|
|
|
|
|
|
|
|
|
|
|
|
|
|
|
Shown in LEDT-311CR |
|
|
|
|
|
|
|
|
|
|
|
|
|
|
|
|
|
|
|
|
|
|
|
|
|
|
|
|
|
|
|
|
|
|
|
|
|
|
|
|
|
|
|
|
|
|
|
|
|
|
|
|
|
|
|
|
|
|
|
|
|
|
|
|
|
|
|
|
|
|
|
|
|
|
|
|
|
|
|
|
|
|
|
|
|
|
|
|
|
|
|
|
|
|
|
|
|
|
|
|
|
|
|
|
|
|
|
|
|
|
|
|
|
|
|
|
|
|
|
|
|
|
|
|
|
|
|
|
|
|
|
|
|
|
|
|
|
|
|
|
|
|
|
|
|
|
|
|
|
|
|
|
|
|
|
|
|
|
|
|
|
|
|
|
|
|
|
|
|
|
|
|
|
|
|
|
|
|
|
|
|
|
|
|
|
|
|
|
|
|
|
|
|
|
|
|
|
|
|
|
|
|
|
|
|
|
|
|
|
|
|
|
|
|
|
|
|
|
|
|
|
|
|
|
|
|
|
|
|
|
|
|
|
|
|
|
|
|
|
|
|
|
|
|
|
|
|
|
|
|
|
|
|
|
|
|
|
|
|
|
|
|
|
|
|
|
|
|
|
|
|
|
|
|
|
|
|
|
|
|
|
|
|
|
|
|
|
|
|
|
|
|
|
|
|
|
|
|
|
|
|
|
|
|
|
|
|
|
|
|
|
|
|
|
|
|
|
|
|
|
|
|
|
|
|
|
|
|
|
|
|
|
|
|
|
|
|
|
|
|
|
|
|
|
|
|
|
|
|
|
|
|
|
|
|
|
|
|
|
|
|
|
|
|
|
|
|
|
|
|
|
|
|
|
|
|
|
|
|
|
|
|
|
|
|
|
|
|
|
|
|
|
|
|
|
|
|
|
|
|
|
|
|
|
|
|
|
|
|
|
|
|
|
|
|
|
|
|
|
|
|
|
|
|
|
|
|
|
|
|
|
|
|
|
|
|
|
|
|
|
|
|
|
|
|
|
|
|
|
|
|
|
|
|
|
|
|
|
|
|
|
|
|
|
|
|
|
|
|
|
|
|
|
|
|
|
|
|
|
|
|
|
|
|
|
|
|
|
|
|
|
|
|
|
|
|
|
|
|
|
|
|
|
|
|
|
|
|
|
|
|
|
|
|
|
|
|
|
|
|
|
|
|
|
|
|
|
|
|
|
|
|
|
|
|
|
|
|
|
|
|
|
|
|
|
|
|
|
|
|
|
|
|
|
|
|
|
|
|
|
|
|
|
|
|
|
|
|
|
|
|
|
|
|
|
|
|
|
|
|
|
|
|
|
|
|
|
|
|
|
|
|
|
|
|
|
|
|
|
|
|
|
|
|
|
|
|
|
|
|
|
|
|